Posted in Entity List, JavaScript/jQuery Plugins, Power Apps Portals

Power Pages – Adding Wildcard on List Search

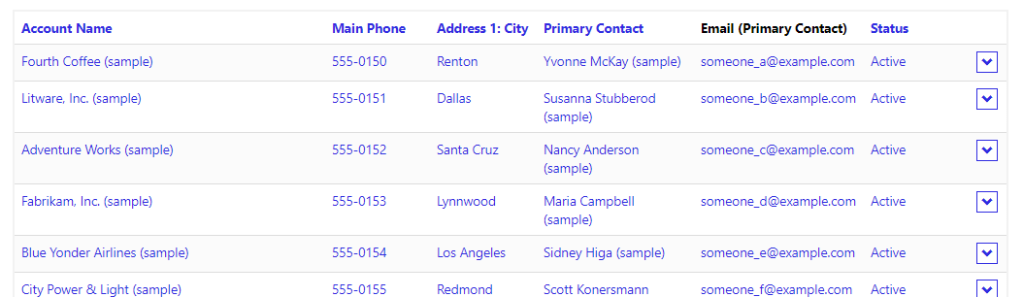
Power Pages gives us the ability of adding a search option to Lists out of the box, which is a great functionality if you consider the effort if we had to implement this manually.

By default, the search looks for the exact match on all columns available in the List, and if you need to use a LIKE operator, you need to add a wildcard (*) to the search term.

If you are coming from a Dynamics 365 background, you are probably very familiar with this behaviour, but when thinking of external users, this might not be the case, and the experience may not be natural to users.

In this quick article I want to share a JavaScript code that will automatically inject an * to the search term whenever the user performs a search. Initially when trying this out I thought it would be a lot easier than it actually was, so here I will explain all the functions and the logic behind the code:

  • AddSearchWildcard: This function will get the text input element for the search, and add a * in the start of the search term
  • ClearWildcardSearch: This function will remove the * from the text input so it all looks transparent to the user
  • ClearSearchTooltip: By default, we have a tooltip explaining to the user to add a *, however this is not necessary, so this function complete removes the tooltip.
  • BindFirst: This function is used to enforce that our AddSearchWildcard function will be executed prior to the search itself
  • document.ready: Finally on document ready the we are registering the BindFirst Function and adding the necessary functions to the appropriate event listeners.

And the full code is:

$(document).ready(function () {
    $.fn.bindFirst = BindFirst;
    var list = $(".entitylist.entity-grid").eq(0);
    list.on("loaded", function () {

        var searchButton = $('.entitylist-search > div.input-group-btn > button');
        searchButton.bindFirst("click", AddSearchWildcard);
        searchButton.on("click", ClearWildcardSearch);
        ClearSearchTooltip();
    });
});

function AddSearchWildcard() {
    var queryInput = $("input.query");
    var queryInputValue = queryInput.val();
    if (!!queryInputValue && !queryInputValue.startsWith("*")) {
        $(queryInput).val("*" + queryInputValue);
    }
};

function ClearWildcardSearch() {
    var queryInput = $("input.query");
    var queryInputValue = queryInput.val();

    if (!!queryInputValue && queryInputValue.startsWith("*")) {
        queryInput.val(queryInputValue.substring(1, queryInputValue.length));
    }
}

function ClearSearchTooltip() {
    var queryInput = $("input.query");
    queryInput.attr("aria-label", "");
    queryInput.attr("data-original-title", "");
};

function BindFirst(eventName, eventHandler) {
    var elem, handlers, i, _len;
    this.bind(eventName, eventHandler);
    for (i = 0, _len = this.length; i < _len; i++) {
        elem = this[i];
        if (!!elem.tagName && elem.tagName == "BUTTON") {
            handlers = $._data(elem).events[eventName.split('.')[0]];
            handlers.unshift(handlers.pop());
        }
    }
}

Conclusion

This solution is great to enhance the user experience when searching within Lists, however keep in mind that this performs a server-side search on every column available in the list, so if you have too many columns and records on your list this might decrease your Portal performance. Before publishing this make sure that your list is already optimized with only necessary columns.

Posted in JavaScript/jQuery Plugins, Power Apps Portals

Power Pages – Autocomplete Lookup / Dropdown

Basic Forms and Advanced Forms in Power Pages are an amazing way to quickly expose Dataverse data to external users for data manipulation.

The way Power Pages works is by reading the Dataverse form metadata to render the controls on the page. Using Basic Form/Advanced Form Metadata, Power Pages also allows us to control styling and behaviour to controls.

One common question I receive is how to convert a dropdown into a autocomplete control, and that’s what we’ll see in this post. Here is an example of what we are about to achieve:

It’s probably obvious, but worth mentioning that this logic is only applicable for the following type of controls:

  • Choices (OptionSet)
  • Lookups (rendered as dropdown via metadata)

I will describe here what my code below is doing, and the things I have considered when putting this together:

  • The function ConvertSelectToAutocomplete takes two arguments:
    • selectName: the schema name of your column (i.e. primarycontactid)
    • selectPlaceholder: optional parameter if you want a placeholder text when it’s blank (i.e. Please start typing…)
  • The function will copy a few elements from the original select element, for example Classes and Readonly attributes
  • Then I am creating a new <input> element pointing to an empty <datalist> and adding this element to the page
  • Now what I do is loop through all <option> within the original <select> element and add the options to the new datalist
  • The original <select> element is no longer necessary, so we can hide it from the page with a .hide()

All actions above are sufficient to convert your dropdown to a HTML5 autocomplete dropdown, but there are still a few more things to get the full solution working properly:

  • If the record being opened already contains value in the Choices/Lookup column, we need to make sure to populate with the original value. For this we will check the current value and try to find the correspondent item within the dataset
  • The last action here is to attach a logic to the OnChange event, the reason for this is that we need to make sure to keep the original column element in the page up to date with the newly selected value as in the form submit is the original element that will be sent to the server

Before we get to the full code, it’s important to note a few things:

  1. Dataset value
    • The control uses a dataset for holding the options available in the dropdown. The dataset value attribute is the text displayed within the dropdown, so I am creating a separate data-value to hold the actual id/value of the item
    • Because of that, every time we need to get the data-value, it has to be done by finding the element within the dataset list (by text)
    • In other words, for this to work properly, your dataset needs to have unique texts, otherwise it might find the wrong item
  2. Invalid entry
    • By default, this control allows you to add an entry that is not listed within the dataset, so we need to prevent this from happening
    • In my code, what I am doing is simply ignoring and removing the selected text, however you can add an error message in the code if it you prefer
$(document).ready(function () {
    ConvertSelectToAutocomplete("<your optionset/lookup dropdown here>");
});

function ConvertSelectToAutocomplete(selectName, selectPlaceholder) {
    selectPlaceholder = selectPlaceholder ?? "";
    var selectElement = $("#" + selectName);
    var selectElementClass = selectElement.attr("class");
    var readonly = $(selectElement).attr("readonly") ?? "";
    var autoCompleteElementId = selectName + "-autocomplete";
    var autoCompleteDatasetId = selectName + "-data";
    var autoCompleteElement = '<input name="' + autoCompleteElementId + '" id="' + autoCompleteElementId + '" class="' + selectElementClass + '" list="' + autoCompleteDatasetId + '" placeholder="' + selectPlaceholder + '" ' + readonly + '><datalist id="' + selectName + '-data"></datalist>';
    var options = "";

    $(selectElement).parent().append(autoCompleteElement);
    $("#" + selectName + " option").each(function (index, o) {
        options += '<option data-value="' + o.value + '" value="' + o.text + '"/>';
    });
    $("#" + autoCompleteDatasetId).html(options);

    $(selectElement).hide();

    var currentSelectedValue = $(selectElement).val();
    if (!!currentSelectedValue) {
        $("#" + autoCompleteElementId).val($(selectElement).find("option:selected").text());
    }

    $("#" + autoCompleteElementId).on("change", function () {
        var selectedValue = $("#" + autoCompleteDatasetId + " option[value='" + $("#" + autoCompleteElementId).val() + "']").attr("data-value");
        selectElement.val(selectedValue);
        if (typeof selectedValue === "undefined") {
            $("#" + autoCompleteElementId).val("");
            // optionally you can add an error message here
        };
    });
};

Conclusion

This is a nice client-side script logic to enhance the user experience in your Portals. I probably wouldn’t use this in every scenario, if you have just a few options like Yes/No/Blank, I would probably not use this; but if your list goes beyond that with 10+ options, this might improve the way users are filling in forms.

Posted in Uncategorized

Power Pages – Power Apps Portals is now Power Pages

Microsoft Build 2022 is coming the announcements of many things throughout the Microsoft stack. I highly recommend catching-up on the sessions for your favourite topics here: https://mybuild.microsoft.com/en-US/home

Power Pages

Power Apps Portals is now Power Pages – and of course this is what I am here to talk about: Announcing Microsoft Power Pages: Build secure, low-code websites | Microsoft Power Pages

This is definitely the most exciting announcement for me personally. Microsoft has put a lot of investment on Power Apps Portals over the years and while it has been part of the Power Apps products for a few years, it is now becoming a product of its own within the Power Platform under the new name of Power Pages.

You may think this is just a product re-branding (as we all know Microsoft loves to do that), but it is a bit more than that, community forum will now have its own dedicated forum now, similar to Power BI or Power Automate, new Site Templates will be available to accelerate your implementation, a complete new Design Studio with many new capabilities and many more. I see all of this is a reflection of the growth of the platform and as a community member very much involved in this product, I am really happy to see this evolution.

What does this mean to your current Portals?

The base of the Portals is still the same, so there is no compatibility issue between them. Microsoft haven’t released yet details on migration, the only potential impact I can think of would be on the domain of your portals (from .powerappsportals.com to .powerpages.com). This should be more clear over the upcoming weeks.

Posted in Dynamics 365, Power Apps Portals

Power Apps Portals – Identify Portal User via Plug-in

If you work with D365/Dataverse for some time, you know how Plug-ins can really extend the platform and open a whole new world of possibilities (if you are new to Dataverse plug-ins, make sure to check out the official documentation: https://docs.microsoft.com/en-us/power-apps/developer/data-platform/write-plug-in).

Microsoft has released a while ago a new PluginExecutionContext class that contains additional details related to Power Apps Portals. This is very useful if you need to identify if the operation is coming from the Portals and to identify the User (Contact) that is performing the action.

This link contains more details of the class: https://docs.microsoft.com/en-us/dotnet/api/microsoft.xrm.sdk.ipluginexecutioncontext2?view=dataverse-sdk-latest

The usage of this is very simple, just initiate a new object for the IPluginExecutionContext2 class and you can get access to the IsPortalsClientCall and PortalsContactId properties:

using Microsoft.Xrm.Sdk;
using System;

namespace OR.Plugins
{
    public class PortalPlugin : IPlugin
    {
        public void Execute(IServiceProvider serviceProvider)
        {
            IPluginExecutionContext2 context = (IPluginExecutionContext2)serviceProvider.GetService(typeof(IPluginExecutionContext2));

            bool isPortalsCall = context.IsPortalsClientCall;

            if (isPortalsCall)
            {
                Guid portalsContactId = context.PortalsContactId;
                if (portalsContactId == Guid.Empty)
                {
                    // anonymous
                }
                else
                {
                    // authenticated
                }
            }
            else
            {
                // not coming from portals
            }
        }
    }
}

In the below example, I am creating a task related to the current record (Account in my case) and setting details in the subject of the task as if this is coming from the Portals or not:

using Microsoft.Xrm.Sdk;
using System;

namespace OR.Plugins
{
    public class PortalPlugin : IPlugin
    {
        public void Execute(IServiceProvider serviceProvider)
        {
            IPluginExecutionContext2 context = (IPluginExecutionContext2)serviceProvider.GetService(typeof(IPluginExecutionContext2));
            IOrganizationServiceFactory serviceFactory = (IOrganizationServiceFactory)serviceProvider.GetService(typeof(IOrganizationServiceFactory));
            IOrganizationService orgService = serviceFactory.CreateOrganizationService(context.UserId);
            string subject = "";

            bool isPortalsCall = context.IsPortalsClientCall;

            if (isPortalsCall)
            {
                Guid portalsContactId = context.PortalsContactId;
                if (portalsContactId == Guid.Empty)
                {
                    subject = "Coming from Portals - Anonymous user";
                }
                else
                {
                    subject = $"Coming from Portals - Authenticated user: {portalsContactId}";
                }
            }
            else
            {
                subject = "Not coming from Portals";
            }

            Entity followup = new Entity("task");

            followup["subject"] = subject;
            followup["scheduledstart"] = DateTime.Now.AddDays(7);
            followup["scheduledend"] = DateTime.Now.AddDays(7);
            followup["regardingobjectid"] = new EntityReference(context.PrimaryEntityName, context.PrimaryEntityId);

            orgService.Create(followup);
        }
    }
}

Then when updating my Account record in three different ways (Model-Driven App / Portals authenticated / Portal unauthenticated), here is the result:

Hope this tip is useful for you and your Power Apps Portals/Dataverse implementation.

Posted in Entity List, JavaScript/jQuery Plugins, Power Apps Portals

Power Apps Portals – Remove default value on Lookup Modal

Following up on a comment from another post: Custom Lookup filter, I feel like this deserves its own dedicated article.

A Lookup column in a Basic Form/Advanced Form in Power Apps Portals is represented in a Web Page by a web control that contains a modal associated to it. This modal gives us the ability to select and filter records for that entity.

If your Lookup column is empty, when clicking on the magnifying glass, the Portals will automatically select the first record:

This behaviour might not be what you are looking for, so in this article I wanted to share a simple JavaScript code that will untick the default value, unless the lookup column already contains data:

$(document).ready(function () {

    var modalList = $("#cr285_customerlookup_lookupmodal").find(".entity-lookup").find(".entity-grid").eq(0);
    modalList.on("loaded", function () {
        var lookupValue = $("#cr285_customerlookup").val();
        if (!!!lookupValue) {
            var selected = modalList.find("table tbody > tr.selected");
            $(selected).find("td[data-th=Select] > span[role='checkbox']").click()
        }

    });
});

Also worth mentioning that this is not removing the record/row from the table within the modal. It is simply deselecting the record.

I hope this helps with your Power Apps Portals implementation.

Update December 2022

I just heard from Microsoft that this has now been fixed and shouldn’t be an issue. This articles is still relevant for injecting code to the lookup window, so I will keep the article here.

Posted in PowerShell

PowerShell – Adding custom HTTP Response Headers

Recently I needed to add a few custom HTTP Response Headers to a Website on an on-premise IIS, and as I will need to do this for multiple servers, I wanted to run a PowerShell script instead of doing it manually on each server.

I really thought that I would be able to quickly find a script to perform this task, but turns out it wasn’t that straight forward. It took me quite a while to get this working (I am no PowerShell expert).

Here is what my script is doing:

  • Create an array of custom object that will contain the Name and Value for the custom headers
  • Get the IIS Configuration for the Website
  • For each item of my array
    • Check if the header name already doesn’t exist in the configuration, and then create it
    • Commit the IIS changes (this is necessary otherwise an error is thrown that the object is in read-only mode)

You don’t really need to create an array and loop through the values, if you want to simplify your code, you can just copy & paste the New-IISConfigCollectionElement instruction multiple times, and this should work as well.

Below is the final script, all you need to do is change Website name and Custom Headers (name and value):

$Website = "My Website"

Import-Module IISAdministration

$CustomHeaders = @(
    [pscustomobject]@{Name="X-XSS-Protection"; Value="1; mode=block"}
    [pscustomobject]@{Name="X-Content-Type-Options"; Value="nosniff"}
    [pscustomobject]@{Name="Content-Security-Policy"; Value="default-src 'self'"}
    [pscustomobject]@{Name="Referrer-Policy"; Value="strict-origin"}
    [pscustomobject]@{Name="Feature-Policy"; Value="fullscreen 'self'"}
)

$CustomHeaders | ForEach-Object {
    $IISConfigSection = Get-IISConfigSection -SectionPath system.webServer/httpProtocol -CommitPath $Website | Get-IISConfigCollection -CollectionName "customHeaders";
    $Header = Get-IISConfigCollectionElement -ConfigCollection $IISConfigSection -ConfigAttribute @{ 'name' = $.Name }
    if(!$Header){
        New-IISConfigCollectionElement -ConfigCollection $IISConfigSection -ConfigAttribute @{"name"=$.Name; "value"=$_.Value;};
        $IIS = Get-IISServerManager
        $IIS.CommitChanges();
    }
}

Posted in Entity List, JavaScript/jQuery Plugins, Power Apps Portals

Power Apps Portals – Entity List: Making the entire row clickable

When creating a page containing an Entity List (or just List) in Power Apps Portals, it is very common to add a details page so users can drill-down to the records details.

The list is represented as below example:

By default, the first column contains the link to the details Web Page as well as the action menu on the right dropdown.

In this post, I will share two options for JavaScript/jQuery code to make the entire row clickable.

Solution 1 – Making each cell clickable

In this example, we will perform the following:

  • Loop through the list, retrieving the URL for record details each row
  • Then we will loop through each individual cell, and attach an <a> element to represent the link
  • The code also needs to ignore the TD containing the dropdown (optionally this can be removed)
SetLinkAllCells = function () {

    var entityList = $(".entitylist.entity-grid").eq(0);

    entityList.on("loaded", function () {
        entityList.find("table tbody > tr").each(function (index, tr) {
            
            var primaryColumn = $(tr).find('td')[0];

            /// or retrieve column by name
            /// var primaryColumn = tr.find('td[data-attribute="name"]');

            var url = $(primaryColumn).find("a")[0].href;
            console.log("URL: " + url);
            if (!!url) {
                $(tr).find('td').each(function (index, td) {
                    /// ignore action menu / dropdown
                    if ($(td).attr("aria-label") == "action menu")
                        return;

                    var cellValue = $(td).text();
                    /// clear td value 
                    $(td).text("");
                    var newElement = '<a href="' + url + '" class="details-link has-tooltip" data-toggle="tooltip">' + cellValue + '</a>';
                    $(td).append(newElement);
                });
            }
        });
    });
};

Solution 2 – Making the table row clickable

In this example, we will perform the following:

  • Loop through the list, retrieving the URL for record details each row
  • Attach a new function to the click event of the row, redirecting the user to the URL
  • Remove the action menu, as this will also be triggered on the row click event
  • Set the cursor to pointer for better UX
SetLinkAllRow = function(){
    var entityList = $(".entitylist.entity-grid").eq(0);

    entityList.on("loaded", function () {
        entityList.find("table tbody > tr").each(function (index, tr) {
            
            var primaryColumn = $(tr).find('td')[0];

            /// or retrieve column by name
            /// var primaryColumn = tr.find('td[data-attribute="name"]');

            var url = $(primaryColumn).find("a")[0].href;
            console.log("URL: " + url);
            if (!!url) {
                $(tr).css("cursor","pointer")
                // remove menu dropdown
                $(tr).find('td[aria-label="action menu"]').remove();

                $(tr).click(function(){
                    window.location.href = url;
                });
            }
        });
    });
};

Now all we need is to use the preferred method:

$(document).ready(function () {
    //SetLinkAllRow();
    // or
    //SetLinkAllCells();
});

Conclusion

Each method might suit different needs, you might also consider ignoring cells that already contain a clickable value, for example e-mail address or phone number columns.

Also if your action menu contains several actions, such as delete / start a workflow, etc, the solution might need a bit of a tweak.

In general, this can be a quick win to improve UX in your Power Apps Portals implementation.

Posted in Entity List, Power Apps Portals

Power Apps Portals – Loading large data in Entity Lists

Entity Lists are a powerful feature from Power Apps Portals to quickly expose data from Dataverse. But loading a large set of data can lead to a terrible user experience if the page keeps loading for a long period of time.

In this article, I will show a trick on how to basically not load the data until the user has applied a filter to the list.

Data and Entity List setup

For this example, I have the following setup:

  • Account table with over 1000 records;
  • Web Page showing an Entity List;
  • Entity List pointing to the Account table, Page Size = 500 and Metadata Filter enabled on the Account name.

When opening my page, this is taking and average of 9 seconds to render, which can be quite a lot and depending on the internet connection this could be even worse.

Entity List – Metadata Filter

Now it’s time for a hidden trick with regards Metadata Filtering. We can actually pre-inject values to the URL and this will be applied before loading the list itself. The format must be the following:

?mf=0=firstvalue%261=secvalue%262=thirdvalue…

Let’s breakdown and understand the meaning of that:

  • ? this just separates the main URL from its parameters, basic web stuff here;
  • mf= means the Metadata Filter, and whatever follows is the value of the mf parameter;
  • 0 means the index of the filter;
  • =firstvalue assigns the first filter value to “firstvalue”;
  • optionally if you have multiple filter attributes:
    • %26 this is the ASCII code for the char &, so basically it is appending multiple parameters;
    • 1 means the index of the second filter;
    • =secvalue assigns the second filter value to “secvalue”;
    • and you can keep going if you want…..

In my example, I only have only filter, so let’s see what happens when I try to load the page by adding the parameter in the url:

Power Apps Portals is reading my URL and automatically assigning a value to the first filter, all this happens at the server-side level and the page is loaded super quick (less than a second).

That’s great, but how to add the custom parameters by default? For that you can check my previous post where I extend the Web Link table to take additional URL parameters: https://oliverrodrigues365.com/2021/03/01/power-apps-portals-adding-parameters-in-menu-links/

This is what my Web Link looks:

I decided to generate a GUID value as I would never have an account with that name, but you could use anything you want here.

Clear the value in Metadata Filter

We are almost there, final step is to clear the value that is present in the Filter on the load of the page, this can be achieved by the following JavaScript/jQuery code:

  $(document).ready(function(){
    ClearFilter();
  });

  function ClearFilter(){
    var params = new URLSearchParams(window.location.search);
    var mf = params.get("mf"); // metadata filters
    if(mf === "0=0eaf2b2b-be3a-4c3c-9e52-1c03431c0d9f"){
      $("#0").val("");
      var listAccounts = $(".entitylist.entity-grid").eq(0);
      listAccounts.on("loaded", function () {
        listAccounts.find(".view-empty.message").text("Please enter a filter criteria to find an Account record!")
      });
    }
  };

Let’s explore what the code is doing:

  • Retrieve the URL Parameters;
  • Retrieve the mf parameter;
  • Check the value for my 0 indexed filter. This is the same value as entered previously in my Web Link – note that you could use anything here, as long as they match;
  • If it’s a match, clear the value for the element with id 0by default, metadata filters are rendered being assigned the id the same as the filter index;
  • Via Entity List, we can setup the message for empty list, but not for “record not found”. This would be possible to change via Content Snippet, but that would be applied to every Entity List in the Portals. For this reason I am changing the message in my list via JavaScript to indicate that the user should enter a filter criteria.

Conclusion

Loading a large set of data is a very common scenario and with very little code we can enhance the user experience by forcing them to use the filter.

Have you every solved this using a different approach? Please post on the comments the strategy you took.

Posted in Menu / Navigation, Power Apps Portals

Power Apps Portals – Adding Parameters in Menu Links

My friend Franco Musso recently wrote a blog post where he shows a few options on what you can do with Custom URL parameters: https://francomusso.com/custom-url-query-parameters-for-your-power-apps-portals.

That blog post has inspired me to write this article, but in here I will be talking about a step before. I will show how to customize the Web Link entity table along with the Header Web Template and get the custom query parameters added once the menu is loaded.

First step is to add a custom attribute column to the Web Link table. I will call it Parameters and add to the form in my Model-Driven App (the format of this should be param1=value,param2=value…..):

Now we need to change the existing Header Web Template to add those parameters in the menu. The changes here should be made where the link <a> element is rendered (circa line 37 in the OOB code):

Here is the liquid code highlighted and an explanation of the changes:

{% if link.cr984_parameters %}
    {% assign linkParams = link.cr984_parameters | split: "," %}
{% endif %}
href="{{ link.url | escape }}{% if linkParams %}?{% for lp in linkParams %}{{ lp }}{% unless forloop.last %}&{% endunless %}{% endfor %}{% endif %}"
  • if my custom column cr984_parameters is not empty, assign an array object (comma separated values) ;
  • now when setting the href property, I am adding a ? and then looping through my parameters array, appending a & until the last position of the array;

As per my snapshot above, I am setting the Home Web Link parameters as param1=hello,param2=world.

Now once cleared the cache and just by hovering the mouse over the Home menu link, this is what I see in my browser:

The same code might need to be applied where the sublinks are rendered, but in my example I will just to it for the main Web Link (parent).

Now we can use the parameters in our page (via Liquid or JavaScript). Just for an example, I will render my parameters via Liquid in my Home Web Page:

Conclusion

Not a lot of people know this, but once making customization to the Portals data model, those changes are reflected in the Liquid objects and can be accessed via code. This is a great trick to extend Power Apps Portals capabilities. Unfortunately if you do these changes you will be limited to using the Portal Management App as this wouldn’t reflect in the Portal Studio.

Possibilities here are endless, please make sure to check out Franco’s post to see other examples of using custom parameters in your Power Apps Portals URL.

Posted in JavaScript/jQuery Plugins, Power Apps Portals

Power Apps Portals – Custom Lookup filter

A common requirement for Power Apps Portals is to add dynamic filters when we open a lookup modal. Unfortunately there is no OOB way to achieve this. It is important to state here that the Portal relies on the Lookup View from your D365/Dataverse, so if you need a static filter you can always change that view:

In this post I will show a customization using client-side code to filter the data presented on the lookup modal. But before that, I’d like to share an article by a community champion that uses a different method: https://www.dancingwithcrm.com/custom-lookup-filtering-powerapps-portal/ by Oleksandr Olashy.

The idea of the article above is to render the lookup as a dropdown, and then use JavaScript/Web Templates to perform a query and finally re-populate the options in the dropdown element.

That approach will probably be enough for most scenarios, but what if you still need to show the Lookup modal as below?:

Here are a few reasons you might want to display the Lookup modal:

  • If your list is a very long list, a dropdown might not be the best experience for the user;
  • You might want to use the search;
  • You might want to display multiple columns;
  • If you have a subgrid and have an action for Associate record, this will always open the lookup-modal.

In my example, I have an Account lookup on the Contact profile form, and the filter I want to do here is hiding certain records if the current user is not an Administrator. I will also add a flag on the Account entity to mark records that should be hidden.

Here is my Account data with no filters via Advanced Find search:

Now I will add the following JavaScript code to the Profile Web Page:

$(document).ready(function () {

    var list = $("#parentcustomerid_lookupmodal").find(".entity-lookup").find(".entity-grid").eq(0);
    list.on("loaded", function () {
        
        // hide "Admin Only" column
        list.find("table thead th").eq(2).hide();
        list.find("table tbody tr").each(function () { $(this).find("td").eq(2).hide(); });

        var isAdmin = "{{ user | has_role: 'Administrators' }}";
        console.log("is admin: " + isAdmin);
        if (isAdmin == "false") {
            list.find("table tbody > tr").each(function () {
                var tr = $(this);
                var adminOnly = $(tr).find('td[data-attribute="cr42c_adminonly"]').attr("data-value");
                if (adminOnly == "true") {
                    tr.remove();
                }
            });
        }
    });
});

If I open the lookup again via Portals, these are the options that I am presented with:

Let’s explore the JavaScript code:

  • I am finding the modal associated with the id parentcustomerid_lookupmodal and injecting a function to the OnLoad event;
  • Optionally, I am hiding the Admin Only column, as I want that column to be for technical purposes only;
  • Using Liquid, I am checking if the user contains the Administrators role;
  • Finally I am looping through the list and checking the value for my Admin Only column, and completely removing the <tr> element in case it’s not supposed to be shown.

Here are a few other business scenarios for which this approach might be applicable:

  • Dynamic filter based on a parent record (performing a query via oData or FetchXML to retrieve the related records);
  • Filter records on an Associate modal – for this we just need to change how to assign the list variable:

From:

var list = $("#parentcustomerid_lookupmodal").find(".entity-lookup").find(".entity-grid").eq(0);

To:

var list = $(".associate-lookup").find(".entity-grid").eq(0);

Conclusion

I really wish we were able to select which view to display in Portal lookups, as well as set them dynamically. Perhaps Microsoft will add this feature in the future, but in the meantime this JavaScript code is a good solution for filtering lookup controls.

I hope this tip comes in handy for your Power Apps Portals project.